Davis Vantage Vue Tune Up Kit 6996M (metric)
Give your Vantage Vue a complete tune up to extend its life.
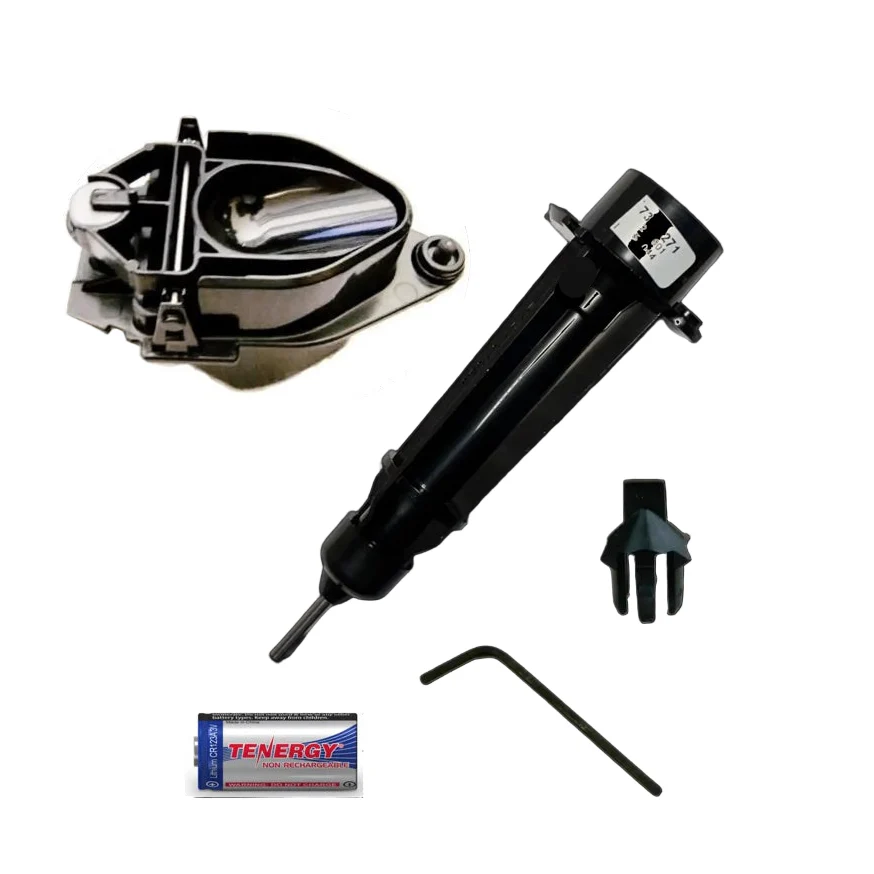
Includes the essentials you need:
- Lithium Battery (UK customers only)
- Rain Tipping Spoon (0.2mm Metric units)
- Rain Debris Screen
- Wind Speed Bearing Assembly
- Allen Wrench
Instructions
As well as the instruction video Davis has also provided written instructions below.
What you need:
- Vantage Vue Complete Tune Up Kit: Product no. 6996M (this kit)
Also recommended is a:
- Soft clean cloth
- Soft brush
- Clear water
- 3 x C batteries for Vantage Vue console, 4 x AA batteries for WeatherLink Live
- Optional: Pipe cleaner, voltmeter
First, to avoid recording erroneous data, power down your console and/or WeatherLink Live. To do this, disconnect AC power and batteries for legacy consoles and WeatherLink Live. To power down the WeatherLink Console, disconnect AC power and use a paperclip to press and hold down the power down button (indicated with a P) on the back of the console. After that, tap “Power off” on the screen. Unmount your sensor suite and take it to a clean, well-lit work space.
Start with the anemometer. Using your Allen wrench, loosen the set screws on the wind cups and remove them. With your fingers, turn the wind cup shaft. It should turn smoothly with no grittiness. If you feel grittiness in the cups, now is the time to replace the wind cartridge. Turn the wind vane. The vane may feel a little “out of balance.” This is okay.
Wipe down the cups and vane with a soft cloth and replace the cups. If the cups or vane are broken, now is the time to replace them.
Next, remove the debris screen and wipe down the rain collector cone. You can use a pipe cleaner to make sure the funnel hole in the rain collector is clear. Rinse with clear water. Remove the rain tipping spoon assembly (on the underside of the sensor suite) by unscrewing the thumbscrew and sliding the assembly down and away. Use a damp soft cloth to gently remove any dust or debris from the tipping spoon. Be careful not to scratch the spoon or damage any moving parts. Rinse with clean water and replace the assembly.
Now is a good time to replace the Lithium battery. It should last years, but why not be proactive? (You can also test it if you have a voltmeter. Replace it if it tests less than 2.8 volts.)
Remove the four screws holding the white plastic housing onto the base. Look inside to make sure there are no insects or nests and that all covers on internal parts are secure. Replace the cover.
Next, remove to the radiation shield. Disassemble the plates, taking care to maintain the order they were in. This will make it much easier to reassemble. Wipe all the plates down and reassemble the shield.
Original: $829.00
-70%$829.00
$248.70Product Information
Product Information
Shipping & Returns
Shipping & Returns
Description
Give your Vantage Vue a complete tune up to extend its life.
Includes the essentials you need:
- Lithium Battery (UK customers only)
- Rain Tipping Spoon (0.2mm Metric units)
- Rain Debris Screen
- Wind Speed Bearing Assembly
- Allen Wrench
Instructions
As well as the instruction video Davis has also provided written instructions below.
What you need:
- Vantage Vue Complete Tune Up Kit: Product no. 6996M (this kit)
Also recommended is a:
- Soft clean cloth
- Soft brush
- Clear water
- 3 x C batteries for Vantage Vue console, 4 x AA batteries for WeatherLink Live
- Optional: Pipe cleaner, voltmeter
First, to avoid recording erroneous data, power down your console and/or WeatherLink Live. To do this, disconnect AC power and batteries for legacy consoles and WeatherLink Live. To power down the WeatherLink Console, disconnect AC power and use a paperclip to press and hold down the power down button (indicated with a P) on the back of the console. After that, tap “Power off” on the screen. Unmount your sensor suite and take it to a clean, well-lit work space.
Start with the anemometer. Using your Allen wrench, loosen the set screws on the wind cups and remove them. With your fingers, turn the wind cup shaft. It should turn smoothly with no grittiness. If you feel grittiness in the cups, now is the time to replace the wind cartridge. Turn the wind vane. The vane may feel a little “out of balance.” This is okay.
Wipe down the cups and vane with a soft cloth and replace the cups. If the cups or vane are broken, now is the time to replace them.
Next, remove the debris screen and wipe down the rain collector cone. You can use a pipe cleaner to make sure the funnel hole in the rain collector is clear. Rinse with clear water. Remove the rain tipping spoon assembly (on the underside of the sensor suite) by unscrewing the thumbscrew and sliding the assembly down and away. Use a damp soft cloth to gently remove any dust or debris from the tipping spoon. Be careful not to scratch the spoon or damage any moving parts. Rinse with clean water and replace the assembly.
Now is a good time to replace the Lithium battery. It should last years, but why not be proactive? (You can also test it if you have a voltmeter. Replace it if it tests less than 2.8 volts.)
Remove the four screws holding the white plastic housing onto the base. Look inside to make sure there are no insects or nests and that all covers on internal parts are secure. Replace the cover.
Next, remove to the radiation shield. Disassemble the plates, taking care to maintain the order they were in. This will make it much easier to reassemble. Wipe all the plates down and reassemble the shield.